Installation
Here reported some case examples on how to install pyFast-ADT and set up the software for the specific microscope brand. take care that the installation procedure is not the same for all the microscopes/camera combination. usually pyFast-ADT is installed in the camera pc and the microscope is interfaced trough TCP/IP connection, some case may vary from this. if you are in doubt please contact us by email to get some tips.
ThermoFisher instruments installation guide
updated guide 19/06/2024 KRIOS G4 Cryo-TEM equipped with CETA camera @MPIP-Mainz. thanks to Dr. Ingo Lieberwirth and MSc. Iain Harley for the access to the instrument.
this guide is intended to help the users that have a brand new microscope from Thermo Fisher scientific, running a CETA or Falcon detector, such as: - Krios - Themis - Glacios - Talos - ecc…
General info
the microscope is equipped with a Gatan K3 camera but at the moment
PyFast-ADTdon’t support K2/3.the microscope is equipped with a CETA CMOS camera to collected 3DED data in continuous rotation mode.
the CETA camera is controlled trough TIA software (TEM Imaging & Analysis). the only requirement to use the camera is that if TIA is open you should see the camera in the list of available cameras in the tab “Camera/TV” in TUI (TEM User Interface).
due to the previous points,
PyFast-ADTcan be installed directly on the microscope computer.
Usually, the microscope pc is a offline (not connected to internet) and running 32 bit Windows 10.
This requires to install a python version X.X.X in 32 bit and all the necessary packages to run the software in 32 bit and offline.
If you spot that your microscope pc is not in 32 bit please setup everything with equivalent packages in 64 bit!!!
In general PyFast-ADT is compatible with both 32 and 64 bit Windows versions
ThermoFisher Installation procedure
The installation procedure is tested using a python 3.9.7 32 bit version and the following packages in this order due to
dependencies issues (you can download them on the PyFast-ADT github page under the folder installation/Krios):
install Python 3.9.7 32 bit and add Python 3.9.7 to the PATH in environment variables (you can choose during the installation to do it, or you can do it manually following this tutorial: https://realpython.com/add-python-to-path/). Python comes natively with pip 21.2.3 and setuptools 57.4.0
  command to run        package name                                version number        details
- install                   pip-24.0-py3-none-any.whl                                       (to install a whl file use in cmd line: pip install name_of_the_file.whl)
- install                   setuptools-70.0.0-py3-none-any.whl
- install                   numpy-1.22.4-cp39-cp39-win32.whl
- install                   temscript-2.0.1-py3-none-any.whl
- install                   six-1.16.0-py2.py3-none-any.whl
- install                   comtypes-1.4.4-py3-none-any.whl
- install                   pywin32-306-cp39-cp39-win32.whl
- install                   pywinauto-0.6.8-py2.py3-none-any.whl
- install                   PyMsgBox-1.0.9                                                  (to install a package from a setup.py file go in cmd line type cd to inside this folder and execute: python -m setup.py install)
- install                   pytweening-1.0.4
- install                   PyRect-0.2.0
- install                   PyGetWindow-0.0.9
- install                   pillow-10.3.0-cp39-cp39-win32.whl
- install                   pyperclip-1.8.2
- install                   MouseInfo-0.1.3
- install                   PyScreeze-0.1.27
- install                   PyAutoGUI-0.9.53
- install                   imageio-2.34.1-py3-none-any.whl
- install                   scipy-1.9.0-cp39-cp39-win32.whl
- install                   tzdata-2024.1-py2.py3-none-any.whl
- install                   pytz-2024.1-py2.py3-none-any.whl
- install                   python_dateutil-2.9.0.post0-py2.py3-none-any.whl
- install                   pandas-2.0.0-cp39-cp39-win32.whl
- install                   opencv_python-4.10.0.84-cp37-abi3-win32.whl
- install                   cycler-0.12.1-py3-none-any.whl
- install                   kiwisolver-1.4.5-cp39-cp39-win32.whl
- install                   pyparsing-3.1.2-py3-none-any.whl
- install                   contourpy-1.2.1-cp39-cp39-win32.whl
- install                   fonttools-4.53.0-cp39-cp39-win32.whl
- install                   packaging-24.1-py3-none-any.whl
- install                   matplotlib-3.6.0-cp39-cp39-win32.whl
- uninstall                 comtypes                                                        by running in cmd line: pip uninstall comtypes
these are all the required packages to run PyFast-ADT. Now we can install the software by:
download the “pyfast_ADT_master” folder from the github page and copy it in the microscope pc (suggested in C:).
from the folder pyfast_ADT_masterpyfast_adt make a copy of the files “temscriptserver_start.bat”, “pyfast_ADT_start.bat” and paste it in your desktop.
edit using a text editor the file “temscriptserver_start.bat” and replace the line to add the correct path to the temspy_socket.py script as: >>> @echo off >>> … >>> start cmd.exe /k C:pyfast_ADT_masterpyfast_adtmainadaptormicroscopetemspy_socket.py >>> … >>> pause
run the “temscriptserver_start.bat” by clicking 2 times on it. 4 cmd line shell will open and inspecting them you should find one called “temspy_socket” and in the first 2 lines you should see the ip address of your pc, take note of it, should be something like: 192.168.4.1
now that we know the ip address we should provide it to the software. using file explorer, go in the folder: “pyfast_ADT_masterpyfast_adtmainadaptorcameralookup_table” and in text editor open the file ceta_table.txt.
>>> {
>>>    "microscope": "Thermofisher Krios 300 kV MPIP @Mainz",
>>>    "ip": ["192.168.21.1", 8080],
>>>    "camera": "CETA",
>>>    .....
>>>    .....
>>> }
in the line “ip”: [“192.168.21.1”, 8080], replace just the ip address between the “” with the one you found before. save the file. optional: if you want you can edit also the “microscope”: “Thermofisher Krios 300 kV MPIP @Mainz” line with the name of your microscope and location, save the file and close it.
now we completed the minimum installation and you should be able to open the GUI of PyFast-ADT.
to do that we need to set up correctly the “pyfast_ADT_start.bat” file.
open it with a text editor you will see something like this:
>>> cd C:\pyfast_ADT_master\pyfast_adt\main
>>> python main_GUI.py
replace the first line with the path where you pasted the “pyfast_ADT_master” folder. if you just pasted it in C: as previously suggested the path should be already fine. otherwise just edit it. save and close it.
now you can double click on the “pyfast_ADT_start.bat” file. A cmd line and the main GUI should open showing you something like:
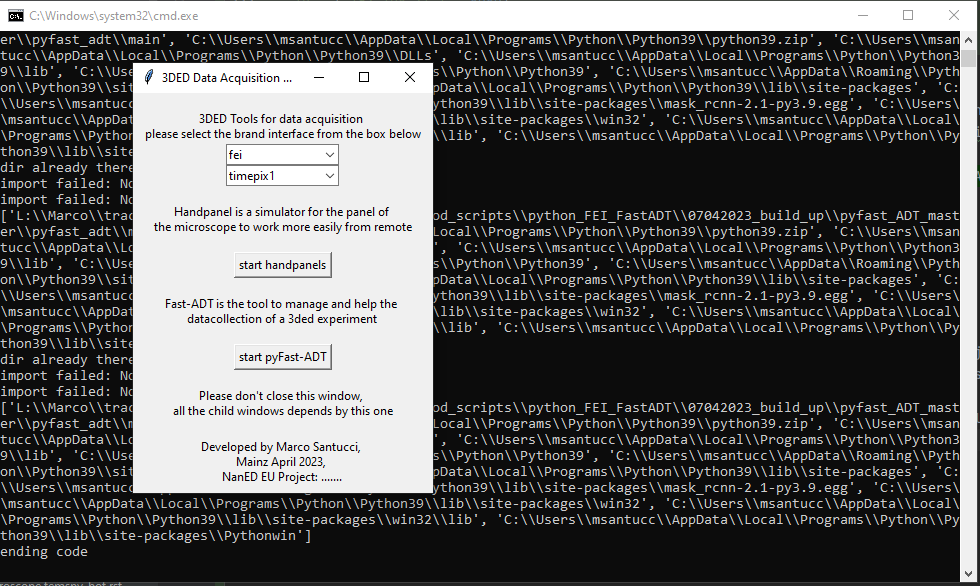
Fig.1 cmd line and main gui of pyFast-ADT.
select in the combo-boxes fei and ceta and click on the button start pyFast-ADT. if everything is fine the GUI of
PyFast-ADT should look like this:
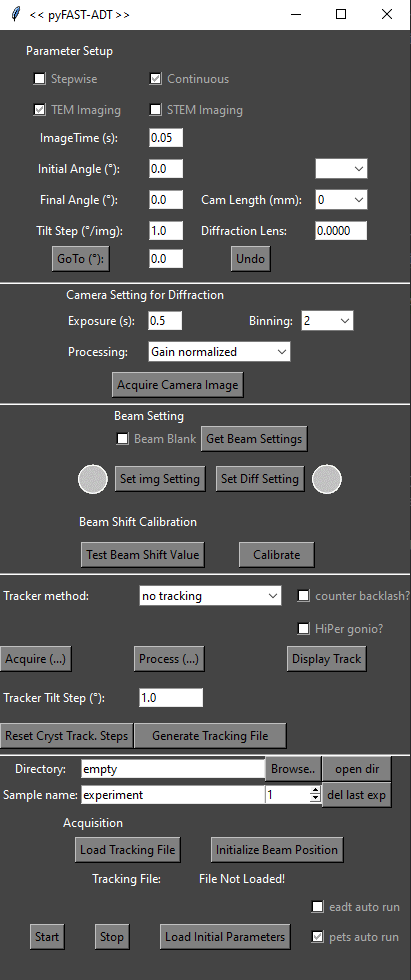
Fig.2 pyFast-ADT GUI.
the installation of PyFast-ADT is completed and you should move on the next section to set up the calibration files.
calibration magnification list and kl of the microscope in TEM mode
calibration of the cred velocities and setting up of the cameraname_speed_lookup_table.csv file
FEI instruments installation guide
this guide is intended to help the users that have a old microscope from former PHILIPS/FEI, running a custom detector, such as: - Tecnai F30 - Tecnai F20 - Tecnai SPIRIT - Tecnai Osiris - Titan
this guide is tested on both a Tecnai F30 and a Tecnai SPIRIT equipped respectively with: - Tecnai F30: Gatan US4000, ASI Timepix1 detectors; - Tecnai SPIRIT: Gatan US2000, TVIPS XF416r GPU accelerated detectors; - Tecnai F20: ASI Medipix3 hpd.
General info
the microscope pc in this case is usually a offline (not connected to internet) and running 32 bit Windows XP SP2/3. in these TEMs the best performing detector used for 3DED data acquisition is controlled by another pc (we will call it camera pc). the camera pc is usually an online pc and running 64 bit Windows 10, so this help us because the installation of the python packages required can be handled by python more or less automatically.
the philosophy of the installation is to install a complete installation of PyFast-ADT in the camera pc which is brand new, and
install instead the minimum python packages necessary to work in the microscope pc.
the software will communicate with the microscope pc trough a TCP/IP connection using the 4 sockets opened by “temscriptserver_start.bat”.
let’s split the job in 2 parts, the microscope pc and the camera pc.
FEI Installation procedure - Microscope pc
As mentioned above the microscope pc is usually a offline and running 32 bit Windows XP SP2/3… usually. This requires to install a python version 3.4.0 in 32 bit and all the necessary packages to run the software in 32 bit and offline.
The installation procedure is tested using a python 3.4.0 32 bit version and the following packages in this order due to
dependencies issues (you can download them on the PyFast-ADT github page under the folder installation/SPIRIT):
install Python 3.4.0 32 bit and add Python 3.4.0 to the PATH in environment variables (you can choose during the installation to do it, or you can do it manually following this tutorial: https://realpython.com/add-python-to-path/). Python comes natively with pip 1.5.4 and setuptools ??.??.??
  command to run        package name                                version number        details
- install                   pip-19.1.1-py2.py3-none-any.whl                                 (to install a whl file use in cmd line: pip install name_of_the_file.whl)
- install                   setuptools-43.0.0-py2.py3-none-any.whl
- install                   numpy-1.9.0-win32-superpack-python3.4.exe                       (is an exe so just double click and follow the steps)
- install                   temscript-2.0.1-py3-none-any.whl
- install                   six-1.16.0-py2.py3-none-any.whl
- install                   comtypes-1.1.10
- install                   pywin32-221.win32-py3.4.exe
- install                   pywinauto-0.6.8-py2.py3-none-any.whl
- install                   PyMsgBox-1.0.9                                                  (to install a package from a setup.py file go in cmd line type cd to inside this folder and execute: python -m setup.py install)
- install                   pytweening-1.0.4
- install                   PyRect-0.2.0
- install                   PyGetWindow-0.0.9
- install                   Pillow-5.1.0.win32-py3.4.exe
- install                   pyperclip-1.8.2
- install                   MouseInfo-0.1.3
- install                   PyScreeze-0.1.27
- install                   PyAutoGUI-0.9.53
- uninstall                 comtypes                                                        by running in cmd line: pip uninstall comtypes
these are all the required packages for the microscope pc to run PyFast-ADT but still another couple of steps are necessary to do still here.
download the “pyfast_ADT_master” folder from the github page and paste it in the microscope pc (location suggested C:).
from the folder pyfast_ADT_masterpyfast_adt make a copy of the files “temscriptserver_start.bat” and paste it in your desktop.
edit using a text editor the file “temscriptserver_start.bat” and replace the line to add the correct path to the temspy_socket.py script as:
>>> @echo off
>>> ...
>>> start cmd.exe /k C:\pyfast_ADT_master\pyfast_adt\main\adaptor\microscope\temspy_socket.py
>>> ...
>>> pause
run the “temscriptserver_start.bat” by clicking 2 times on it. 4 cmd line shell will open and inspecting them you should find one called “temspy_socket” just check that you have no error in the cmd line there. now we finished with the microscope pc and we can move to the camera pc.
FEI Installation procedure - Camera pc
after installing PyFast-ADT in the microscope pc we can move to the camera pc.
This will be the pc with a full installation of PyFast-ADT which will be used to control the data acquisition.
This guide is based on installing a python version 3.9.7 up to 3.9.13 in 64 bit.
The following packages in this order due to dependencies issues (you can download them on the PyFast-ADT github page under the folder installation/SPIRIT):
install Python 3.9.7 or 3.9.13 64 bit and add Python to the PATH in environment variables (you can choose during
the installation to do it, or you can do it manually following this tutorial: https://realpython.com/add-python-to-path/). Python comes natively with pip and setuptools but they need to be upgraded. due to the fact that this is an online pc we can install most of the packages directly using pip install “package_name”
  command to run        package name        version number        details
- install --upgrade         pip                 24.3.1
- install --upgrade         setuptools          75.5.0
- install                   numpy               2.0.2               the core of numpy changed so maybe if we have trouble we roolback
- install                   temscript           2.0.1
- install                   six                 1.16.0
- install                   comtypes            1.4.8
- install                   pywin32             308
- install                   pywinauto           0.6.8
- install                   PyAutoGUI           0.9.54
- install                   imageio             2.36.0
- install                   scipy               1.13.1
- install                   pandas              2.2.3
- install                   opencv_python       4.10.0.84
- install                   matplotlib          3.6.0
- install                   filterpy            1.4.5               this is a new package!! to update previous versions of the docs!!
- uninstall                 comtypes
- install                   serval_toolkit                          this need to be installed manually from the folder probably (required only if you run a asi medipix camera otherwise skip it)

- finished installation, open main_gui
JEOL instruments installation guide
this guide is intended to help the users that have a old microscope from JEOL not running PyJEM (this means your microsope pc is running windows XP), running a custom detector, such as:
JEM 2100F
…
…
…
…
this guide is tested on a JEOL JEM 2100F equipped respectively with: - Gatan US1000, Merlin quad-core QD hpd;
General info
the microscope pc in this case is usually a offline (not connected to internet) and running 32 bit Windows XP SP2/3 (if you have a recent 64 bit JEOL machine the procedure should work the same but need to be tested). in these TEMs the best performing detector used for 3DED data acquisition is controlled by another pc (we will call it camera pc). the camera pc is usually an online pc and running 64 bit Windows 10, so this help us because the installation of the python packages required can be handled by python more or less automatically.
the philosophy of the installation is to install a complete installation of PyFast-ADT in the camera pc which is brand new, and
install instead the minimum python packages necessary to work in the microscope pc.
the software will communicate with the microscope pc trough a TCP/IP connection using TemExt.dll which handle the exchange
of info between microscope and camera pc.
let’s split the job in 2 parts, the microscope pc and the camera pc.
JEOL Installation procedure - Microscope pc
no python packages need to be installed here since the microscope control is passing trough the temext.dll. so for now we just skip here and move to the camera pc.
JEOL Installation procedure - Camera pc
in our case this pc is provided by QD company togheter with the camera and run win 10 32 bit!
The installation procedure is tested using a python 3.9.7 32 bit version and the installation of the following packages should be followed in this order due to
dependencies issues (you can download them on the PyFast-ADT github page under the folder installation/JEM2100F).
most of the packages can be installed by just calling pip install “name_of_the_package”==”version_number”, i.e. pip install pandas==1.3.
install Python 3.9.7 32 bit and add Python 3.9.7 to the PATH (write down the full path of the python.exe file, you will need it later)
  command to run      package name        version number        details
- update                pip                 24.0
- update                setuptools          70.0.0
- install               numpy               1.22.4
- install               temscript           2.0.1
- install               six                 1.16.0
- install               comtypes            1.4.4
- install               pywin32             306
- install               pywinauto           0.6.8
- install               PyMsgBox            1.0.9               from here up to pyautogui skip because we will use pip from the web
- install               pytweening          1.0.4
- install               PyRect              0.2.0
- install               PyGetWindow         0.0.9
- install               pillow              10.3.0
- install               pyperclip           1.8.2
- install               MouseInfo           0.1.3
- install               PyScreeze           0.1.27
- install               PyAutoGUI           0.9.53              from here down manual installation
- install               imageio             2.34.1
- install               scipy               1.9.0
- install               tzdata              2024.1              skip up to pandas
- install               pytz                2024.1
- install               python_dateutil     2.9.0.post0
- install               pandas              2.0.0               from here down manual installation
- install               opencv_python       4.10.0.84
- install               cycler              0.12.1
- install               kiwisolver          1.4.5
- install               pyparsing           3.1.2
- install               contourpy           1.2.1
- install               fonttools           4.53.0
- install               packaging           24.1
- install               matplotlib          3.6.0
these are all the required packages for the camera pc to run PyFast-ADT but still another couple of steps are necessary to do still here.
download the “pyfast_ADT_master” folder from the github page and paste it in the camera pc (location suggested C:PyFastADT).
…
finished installation, run main_gui and everything should be fine. if you are not able to control the microscope is because the temext.dll is not installed or not working properly. check the next section about setting temext.dll correctly.
JEOL Installation procedure - Camera pc
THIS PART IS TO CLEAN !! THIS IS JUST MY DOCS DURING THE INSTALLATION
how to set up temext.dll for jeol microscopes and open COM interface for scripting. run the script adaptor_jeol.py in a pc that have the dll TemExt.dll this is usually present in C:/Program Files/JEOL/External or something similar if you get errors like class not registered or impossible to load DLL is because in the windows registry there is an error in the path.
before doing that in a cmd line type: regedit this will open the registry editor and search for the CLSID {CE70FCE4-26D9-4BAB-9626-EC88DB7F6A0A} this should be present and look like one of the image that i saved in the phone if the CLSID is registered check the path if exist. if not exist follow the next step to overwrite the dll path
to fix it you need to refresh the path. write down the exact path of the dll. in my case this is “C:/Program Files/JEOL/External/TemExt.dll” with admin rights open a cmd line amnd type: regsvr32 “C:/Program Files/JEOL/External/TemExt.dll”
now if you run the script .py again you should see the output of the lenses theoretically TemExt.dll is able trough the network to talk with the temserver so you should be able to use instamatic from whatever pc contain this dll registered correctly and interface it trough COM.
up to now i’m not able to read out the correct values and also if i try to set like the fluoscreen position i don’t get answer out of it
additional info: installed comtypes 1.2.1 in windows xp py3.4 and looks working nicely and typing 3.6.6
notes: try to access the temext.dll, got only zeros, so the program don’t connect to the tem. after a lot of mangling in temextreg.exe putting the right ports (2001, 2010) and just pressing ok to close the program magically it started to work. so just try next time in temextreg to give it the ip adress and ports up to the programm is working in the merlin pc! don’t touch the temextreg in the microscope PC.